与华为 AR Engine 协同工作
EasyAR 支持的华为 AR Engine 版本
EasyAR Sense Unity Plugin 支持官方的 Huawei AR Engine Unity SDK 2.11.0,其发布文件是 arenginesdk-tool-2.11.0.2.zip 。
华为目前不再维护 AR Engine 的 Unity SDK,因此我们并不确定是否更新版本的 AR Engine 可以使用。同时,由于 Huawei AR Engine Unity SDK 使用了一些废弃的 Unity API,它不能在 Unity 2020.1 或更新版本上使用。
EasyAR Sense Unity Plugin 目前还不支持没有官方Unity SDK的华为 AR Engine。
导入华为 AR Engine Unity Asset Package
如果你已经有一个可以运行的Huawei AR Engine Unity SDK工程,可以跳过这一步。
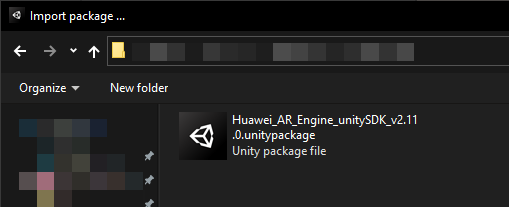
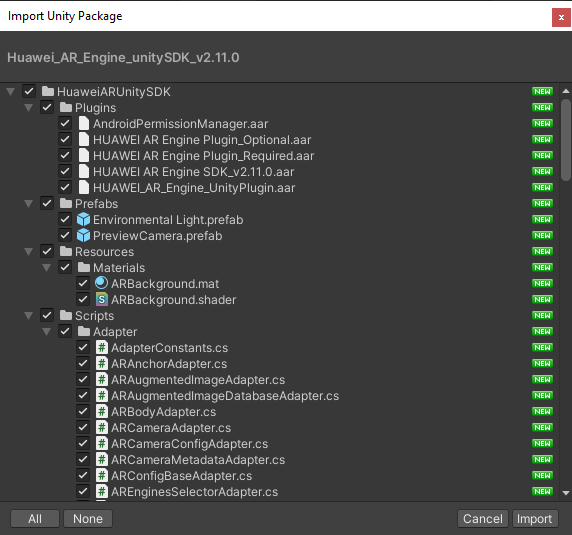
首先获取华为 AR Engine Unity SDK,然后使用 Unity > Assets > Import Package 导入它的 unitypackage 。
创建华为 AR Engine Unity Package (Virtual)
在这个版本发布的时候,Huawei AR Engine Unity SDK还未发布成一个Unity Package,但EasyAR会使用Unity Package来检查和使用依赖。
在Unity工程的 Packages 文件夹中创建一个文件夹 com.huawei.arengine ,并在该文件夹中创建文件 package.json ,其内容如下,注意其中 version 字段值需与你获取的Huawei AR Engine Unity SDK的版本号一致。
{
    "name": "com.huawei.arengine",
    "displayName": "HUAWEI AR Engine",
    "version": "2.11.0",
    "unity": "2017.4",
    "description": "",
    "keywords": [],
    "dependencies": {}
}
在Unity工程的 Assets/HuaweiARUnitySDK/Scripts 文件夹中创建 Huawei.AREngine.asmdef 文件,其内容如下,
{
    "name": "Huawei.AREngine",
    "references": [],
    "includePlatforms": [
        "Android",
        "Editor"
    ],
    "excludePlatforms": [],
    "allowUnsafeCode": false,
    "overrideReferences": false,
    "precompiledReferences": [],
    "autoReferenced": true,
    "defineConstraints": [],
    "versionDefines": [],
    "noEngineReferences": false
}
在Unity工程的 Assets/HuaweiARUnitySDK/Scripts/Editor 文件夹中创建 Huawei.AREngine.Editor.asmdef 文件,其内容如下,
{
    "name": "Huawei.AREngine.Editor",
    "references": [
        "Huawei.AREngine"
    ],
    "includePlatforms": [
        "Editor"
    ],
    "excludePlatforms": [],
    "allowUnsafeCode": false,
    "overrideReferences": false,
    "precompiledReferences": [],
    "autoReferenced": true,
    "defineConstraints": [],
    "versionDefines": [],
    "noEngineReferences": false
}
在创建完上述文件之后,Unity工程目录中的文件结构会是这样的
.
├── Assets
│   └── HuaweiARUnitySDK
│       ├── Plugins
│       ├── Prefabs
│       ├── Resources
│       └── Scripts
│           ├── Editor
│           │   └── Huawei.AREngine.Editor.asmdef
│           └── Huawei.AREngine.asmdef
└── Packages
   └── com.huawei.arengine
       └── package.json
如果今后华为官方通过Unity Package来发布SDK,就不再需要创建这个虚拟的Package。但如果华为官方发布的package name与上面不同,则需要修改EasyAR Package中所有 .asmdef 文件中使用到的 com.huawei.arengine 字符串为Nreal官方的name。
创建可运行华为AR Engine的场景
如果你已经有一个可以运行的Huawei AR Engine Unity SDK工程,可以跳过这一步。
如果你可以获取华为 AR Engine Unity SDK 的样例,可以以它们为起点创建可运行华为AR Engine的场景。
或者也可以从头创建这个场景,操作方法非常简单。
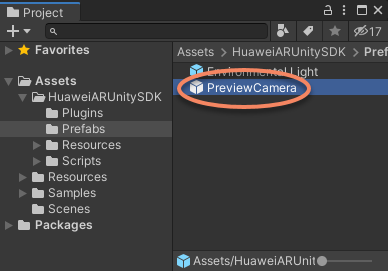
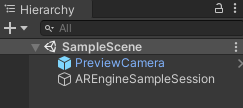
首先,你需要在场景中添加一个 PreviewCamera ,它是个prefab,位于 Assets/HuaweiARUnitySDK/Prefabs/PreviewCamera.prefab 。
然后创建一个空节点,命名为 AREngineSampleSession ,然后添加一个新的组件用以处理华为 AR Engine 的AR Sessionz。一个简单的可重用的例子如下,
using UnityEngine;
using easyar;
using HuaweiARUnitySDK;
using System;
using System.Collections;
using HW = HuaweiARUnitySDK;

namespace Sample
{
    // NOTE: AR Engine do not handle update order, but everything should go after ARSession.Update.
    //       Use the undocumented DefaultExecutionOrder is a simple solution for package distribution, you can use your own way.
    [DefaultExecutionOrder(int.MinValue)]
    public class AREngineSampleSession : MonoBehaviour
    {
        public ARConfigBase Config;

        private bool isSessionCreated;
        private bool? installed;
        private Vector2Int resolution;
        private ScreenOrientation orientation;

        private void Start()
        {
            if (Application.platform != RuntimePlatform.Android) { return; }
            StartCoroutine(CreateSession());
        }

        public void Update()
        {
            if (!isSessionCreated) { return; }
            SetDisplayGeometry();

            AsyncTask.Update();
            HW.ARSession.Update();
        }

        public void OnDestroy()
        {
            if (!isSessionCreated) { return; }
            HW.ARSession.Stop();
        }

        public void OnApplicationPause(bool isPaused)
        {
            if (!installed.HasValue && !isPaused)
            {
                CheckService();
            }
            if (!isSessionCreated) { return; }

            if (isPaused)
            {
                HW.ARSession.Pause();
            }
            else
            {
                HW.ARSession.Resume();
            }
        }

        private IEnumerator InstallRequired()
        {
            CheckService();
            while (!installed.HasValue)
            {
                yield return null;
            }
        }

        private IEnumerator CreateSession()
        {
            yield return InstallRequired();
            if (CheckService())
            {
                CameraDevice.requestPermissions(EasyARController.Scheduler, (Action<PermissionStatus, string>)((status, msg) =>
                {
                    if (status != PermissionStatus.Granted)
                    {
                        throw new UIPopupException("Camera permission not granted");
                    }

                    try
                    {
                        HW.ARSession.CreateSession();
                        HW.ARSession.Config(Config);
                        HW.ARSession.Resume();
                        HW.ARSession.SetCameraTextureNameAuto();
                        SetDisplayGeometry();
                        isSessionCreated = true;
                    }
#if false // you can turn on this code path if you change the class to public
                    catch (ARCameraPermissionDeniedException)
                    {
                        throw new UIPopupException("Camera permission not granted");
                    }
                    catch (ARUnavailableServiceApkTooOldException)
                    {
                        throw new UIPopupException("This AR Engine is too old, please update");
                    }
                    catch (ARUnSupportedConfigurationException)
                    {
                        throw new UIPopupException("This config is not supported on this device");
                    }
#endif
                    catch (ARUnavailableDeviceNotCompatibleException)
                    {
                        throw new UIPopupException("This device does not support AR Engine");
                    }
                    catch (ARUnavailableServiceNotInstalledException)
                    {
                        throw new UIPopupException("This app depend on AREngine.apk, please install it");
                    }
                    catch (SystemException e)
                    {
                        throw new UIPopupException($"{e.Message} Please restart the app");
                    }
                    catch (ApplicationException e)
                    {
                        throw new UIPopupException(e.ToString());
                    }
                }));
            }
        }

        private bool CheckService()
        {
            if (installed.HasValue) { return installed.Value; }
            if (Application.platform != RuntimePlatform.Android)
            {
                installed = false;
                return false;
            }

            installed = AREnginesApk.Instance.IsAREngineApkReady();
            return installed.Value;
        }

        private void SetDisplayGeometry()
        {
            if (resolution.x != Screen.width || resolution.y != Screen.height)
            {
                resolution = new Vector2Int(Screen.width, Screen.height);
                HW.ARSession.SetDisplayGeometry(resolution.x, resolution.y);
            }
            if (orientation != Screen.orientation)
            {
                orientation = Screen.orientation;
                HW.ARSession.SetDisplayGeometry(resolution.x, resolution.y);
            }
        }
    }
}
在 Project 窗口中右键点击然后创建一个 Huawei AR Config,比如使用 Create > HuaweiARUnitySDK > WorldTrackingConfig ,

并将它设置到 AREngineSampleSession Config中,

然后这个场景会看起来如下,它已经可以运行了。
同样,你也可以使用prefab或脚本添加 Environmental Light 或平面检测功能。 HuaweiAREngine 样例同时使用了华为 AR Engine 平面检测和AR anchor,以及EasyAR的稀疏空间地图和稠密空间地图建图功能,可以参考这个sample来了解更多信息。
在场景中添加 EasyAR 组件
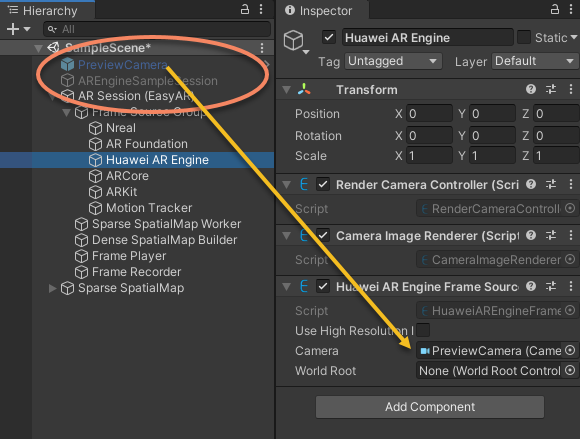
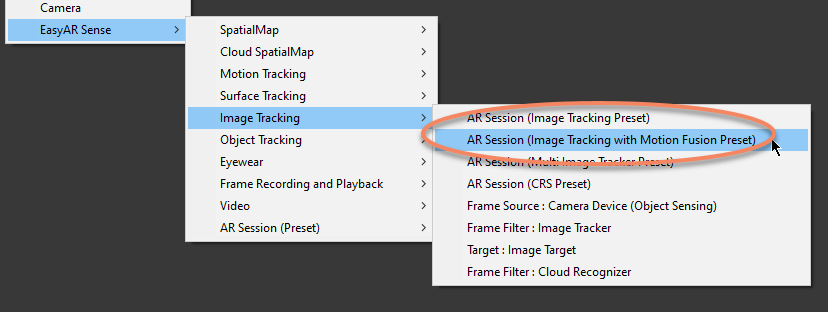
参考 从零创建可运行的工程 中的描述,在场景中添加EasyAR的AR Session及其它需要的节点。可以使用GameObject菜单中的 EasyAR Sense > 一些AR Session预设或单独功能创建完成所需功能需要的AR Session。 需要确保 session中有 HuaweiAREngineFrameSource 。
SpatialMap, Cloud SpatialMap, Motion Tracking 的 AR Session 预设都包含 HuaweiAREngineFrameSource
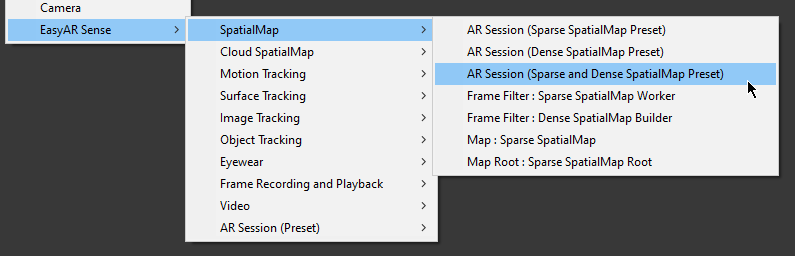
Image Tracking 和 Object Tracking 的 AR Session 预设中名字中含有 Motion Fusion 的也包含 HuaweiAREngineFrameSource
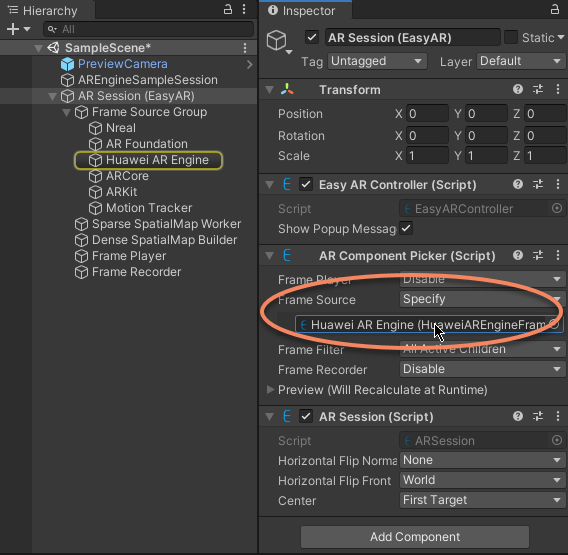
为了让EasyAR与华为 AR Engine协同使用, 需要注意在AR Session启动后 HuaweiAREngineFrameSource 可以被选择为Session的frame source。
通常可以设置 ARComponentPicker.FrameSource 为 FirstAvailableActiveChild 并确保 HuaweiAREngineFrameSource 的transform顺序是所有可以使用的frame source的第一个,
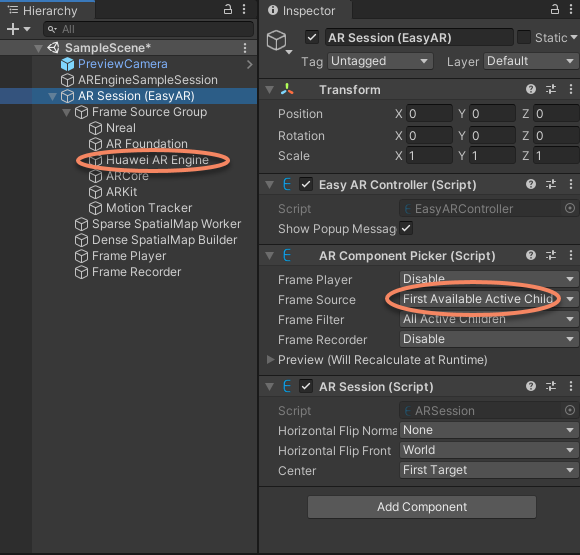
在上图中,如果Nreal SDK和AR Foundation没有导入或没有添加进场景, NrealFrameSource 以及 ARFoundationFrameSource 不会被选择使用,所以这种使用是安全的。
或者也可以设置 ARComponentPicker.FrameSource 为 Specify 并手动指定为 HuaweiAREngineFrameSource 。
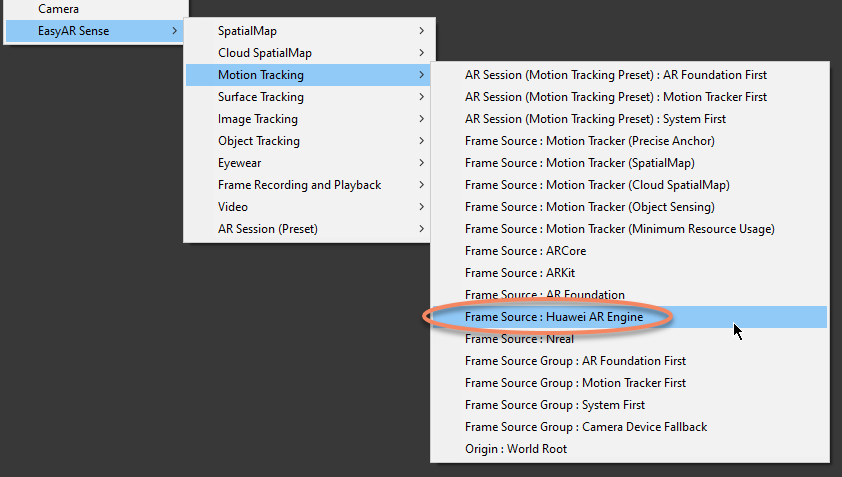
如果AR Session中还没有 HuaweiAREngineFrameSource ,可以通过菜单 EasyAR Sense > Motion Tracking > Frame Source : AR Foundation 添加。
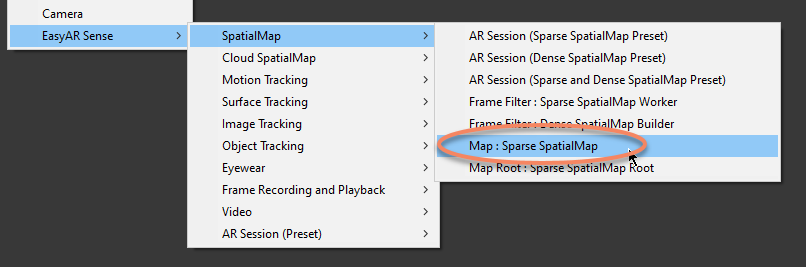
然后需要在场景中创建 Target 或 Map,比如,如果你需要使用 稀疏空间地图 建图功能,你需要使用 EasyAR Sense > SpatialMap > Map : Sparse SpatialMap 创建 SparseSpatialMapController ,
最后,一个简单的可以在使用华为AR Engine同时运行稀疏空间地图和稠密空间地图建图功能的场景可能是这样的,
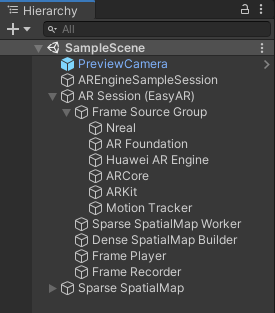
场景可能会根据使用的华为AR Engine或EasyAR Sense Unity Plugin 功能不同而不同。
运行时选择华为AR Engine
MotionTracking_Fusion 样例展示了一种高级使用,可以在app启动时根据设备能力选择 frame source ,以及允许运行时在所有可用 frame source 间切换。为了实现这种用法,你需要deactive华为AR Engine使用的所有GameObject,并设置所有frame source可用性检查所需要的数值,然后在这个frame source被选择后active 华为AR Engine的GameObject。