ImageTracking_Targets
演示平面图像跟踪功能。
演示创建target的不同方法
演示动态创建target
演示通过ImageTargetData创建target的方法
演示如何加载和卸载target
演示如何使用不同中心模式(center mode)
演示如何使用不同的水平翻转模式
用法
详解
场景中的target
如果你需要替换sample中的图像,需要确保选择一个纹理丰富的 .jpg 或 .png 文件。建议阅读 这篇指南 来帮助选择一个可跟踪的图像。
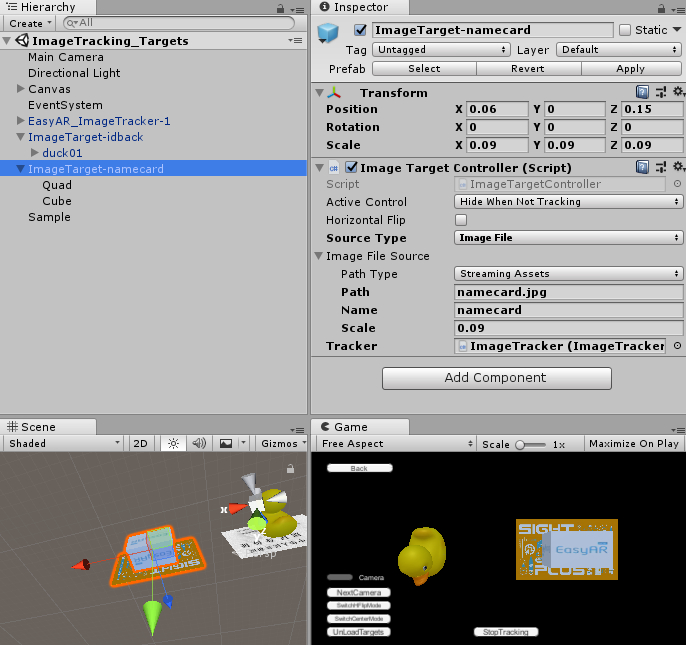
Target可以直接在 Unity 编辑器的inspector中配置。
Active Control: Targets 及其 children 将在 target 未被跟踪时隐藏。如果你需要在跟踪丢失时保持显示,可以修改这个参数,也可以写自己的处理策略。
Source Type: 根据这个参数的数值,targets会从 Image File 或 Target Data File 中创建。
Path Type: 这里设置为 StreamingAssets ,表示 Path 将使用相对于StreamingAssets的路径。
Path: 这个sample中使用图片相对于StreamingAssets的路径。
Name: target名字,可以随意输入。
Scale: 根据识别图宽度实际的物理大小设置。
Tracker: 需要加载ImageTarget的Tracker。
Gizmo将会在target设置有效的时候显示,如有需要也可以在全局配置中关闭。在game view不会显示。game view中namecard的图像是场景中 ImageTarget-namecard 节点下的一个quad。
方块和鸭子的 transform 被调整为底面与识别图对齐。在运行这个场景并跟踪到 target的时候,方块和鸭子会在图像上面显示。
在脚本中创建target -- 从图像创建
可以在脚本中使用图像来创建target。基本上需要做的事情就是把 inspector中的配置在脚本中通过代码做一遍。首先需要创建一个空的 GameObject 并添加 ImageTargetController 。
private ImageTargetController CreateTargetNode(string targetName)
{
    GameObject go = new GameObject(targetName);
    var targetController = go.AddComponent<ImageTargetController>();
    ...
}
然后像在inspector中一样设置 ImageTargetController 的 Tracker、SourceType、ImageFileSource.PathType、ImageFileSource.Path、ImageFileSource.Name、ImageFileSource.Scale 的值。
var targetController = CreateTargetNode("ImageTarget-argame00");
targetController.Tracker = imageTracker;
targetController.SourceType = ImageTargetController.DataSource.ImageFile;
targetController.ImageFileSource.PathType = PathType.StreamingAssets;
targetController.ImageFileSource.Path = "sightplus/argame00.jpg";
targetController.ImageFileSource.Name = "argame00";
targetController.ImageFileSource.Scale = 0.1f;
在GameObject节点下添加物体,以便在target被跟踪时显示。
GameObject duck02 = Instantiate(Resources.Load("duck02")) as GameObject;
duck02.transform.parent = targetController.gameObject.transform;
在脚本中创建target -- 从列表创建
可以在脚本中通过一个有详细信息的列表创建target。你需要自己定义这个列表的描述。加载json文件的接口已经废弃并在Sense新版本中已经不再被支持。自己定义列表可以在不损失性能的情况下提供定义自己的target描述的灵活性。
类似EasyAR Sense 1.0的json配置的定义可以这样描述,
var imageJosn = JsonUtility.FromJson<ImageJson>(@"
{
    ""images"" :
    [
        {
            ""image"" : ""sightplus/argame01.png"",
            ""name"" : ""argame01""
        },
        {
            ""image"" : ""sightplus/argame02.jpg"",
            ""name"" : ""argame02"",
            ""scale"" : 0.2
        },
        {
            ""image"" : ""sightplus/argame03.jpg"",
            ""name"" : ""argame03"",
            ""scale"" : 1,
            ""uid"" : ""uid string will be ignored""
        }
    ]
}");
只需要通过一个循环来创建target就可以,所有耗时过长会在背景线程中处理。
foreach (var image in imageJosn.images)
{
    targetController = CreateTargetNode("ImageTarget-" + image.name);
    targetController.Tracker = imageTracker;
    targetController.ImageFileSource.PathType = PathType.StreamingAssets;
    targetController.ImageFileSource.Path = image.image;
    targetController.ImageFileSource.Name = image.name;
    targetController.ImageFileSource.Scale = image.scale;

    var duck03 = Instantiate(Resources.Load("duck03")) as GameObject;
    duck03.transform.parent = targetController.gameObject.transform;
}
Target事件
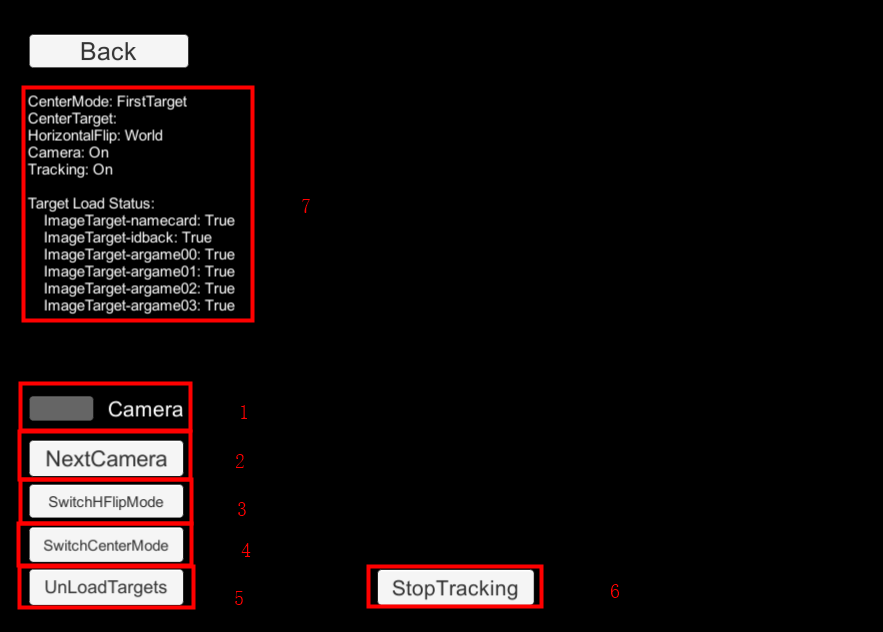
Target事件可以用来处理自定义操作。这个sample使用这些事件来输出一些日志。在使用中可以删除这些日志,也可以添加自己的应用逻辑。
controller.TargetFound += () =>
{
    Debug.LogFormat("Found target {{id = {0}, name = {1}}}", controller.Target.runtimeID(), controller.Target.name());
};
controller.TargetLost += () =>
{
    Debug.LogFormat("Lost target {{id = {0}, name = {1}}}", controller.Target.runtimeID(), controller.Target.name());
};
controller.TargetLoad += (Target target, bool status) =>
{
    Debug.LogFormat("Load target {{id = {0}, name = {1}, size = {2}}} into {3} => {4}", target.runtimeID(), target.name(), controller.Size, controller.Tracker.name, status);
};
controller.TargetUnload += (Target target, bool status) =>
{
    Debug.LogFormat("Unload target {{id = {0}, name = {1}}} => {2}", target.runtimeID(), target.name(), status);
};
加载卸载Target
Target的加载和卸载非常简单。设置 ImageTargetController.Tracker 为 null,target 就会被卸载,而设为某个 tracker,target就会立即被加载进去。
public void UnloadTargets()
{
    foreach (var item in imageTargetControllers)
    {
        item.Key.Tracker = null;
    }
}

public void LoadTargets()
{
    foreach (var item in imageTargetControllers)
    {
        item.Key.Tracker = imageTracker;
    }
}
开关跟踪
ImageTrackerFrameFilter.enabled 可以控制图像跟踪功能的开关。可以在不需要的时候关闭跟踪来节省资源。跟踪关闭的时候不会对camera或其它跟踪功能产生影响。
public void Tracking(bool on)
{
    imageTracker.enabled = on;
}
开关相机
VideoCameraDevice.enabled 可以控制Camera设备的开关。如果camera关闭,跟踪功能将停止收到数据,整个AR链条将停止。
public void EnableCamera(bool enable)
{
    cameraDevice.enabled = enable;
}
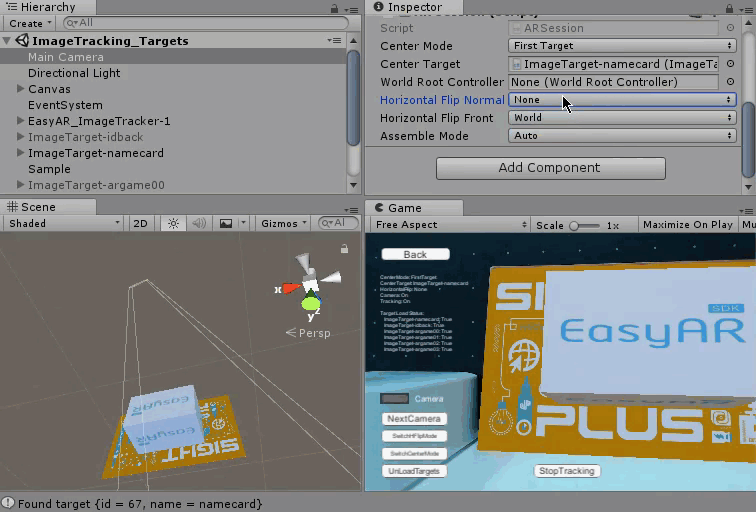
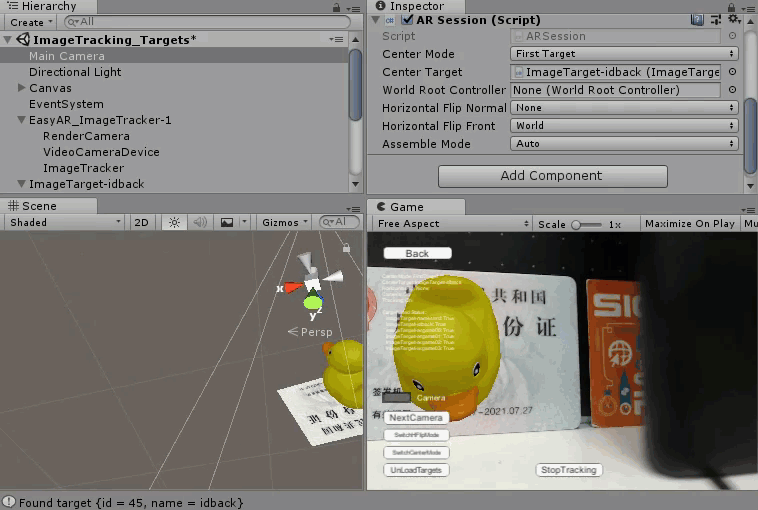
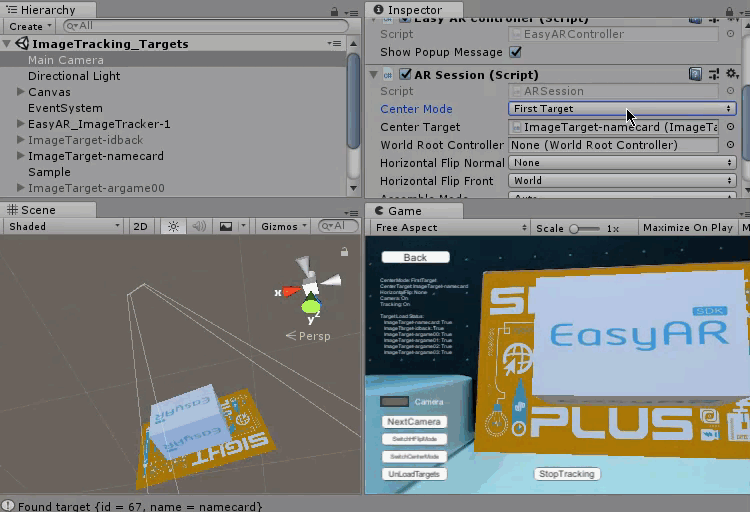
中心模式
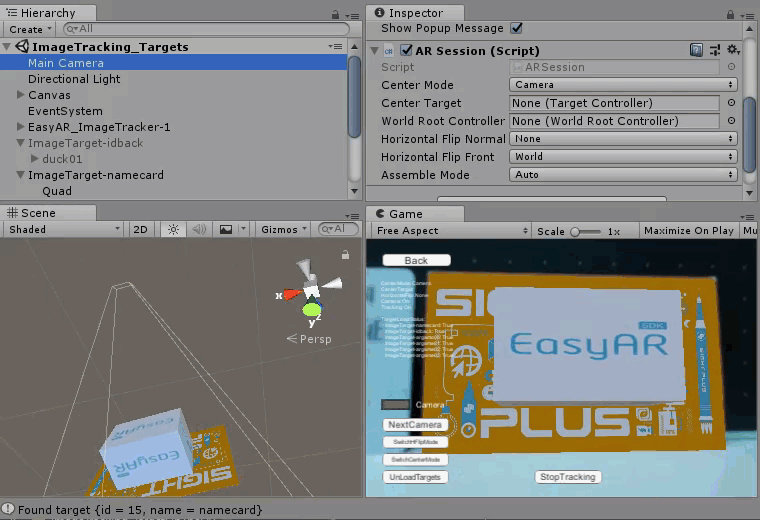
在物体感知功能中,有三个 ARSession.CenterMode 的模式是有效的。
在 ARSession.ARCenterMode.Camera 模式中,设备运动时camera不会自动移动。
在 ARSession.ARCenterMode.FirstTarget 或 ARSession.ARCenterMode.SpecificTarget 模式中,camera会在设备运动时自动移动,而target不会动。

为了说明 ARSession.ARCenterMode.FirstTarget 与 ARSession.ARCenterMode.SpecificTarget 之间的不同,我们修改了 tracker 配置以同时跟踪两个target。
在 ARSession.ARCenterMode.FirstTarget 模式中,有target被跟踪时camera会移动,而中心将会是第一个被跟踪到的target,这个target丢失的时候中心会切换到其它target。
在中心target没有变化的时候, ARSession.ARCenterMode.SpecificTarget 模式会一直使用指定的target作为中心,如果这个target丢失,camera将不会移动。
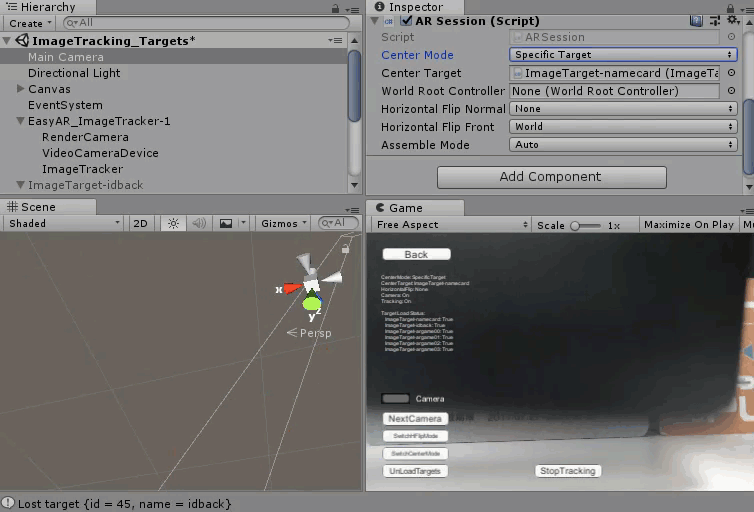
ARSession.CenterMode 可以随时修改并将立即生效。
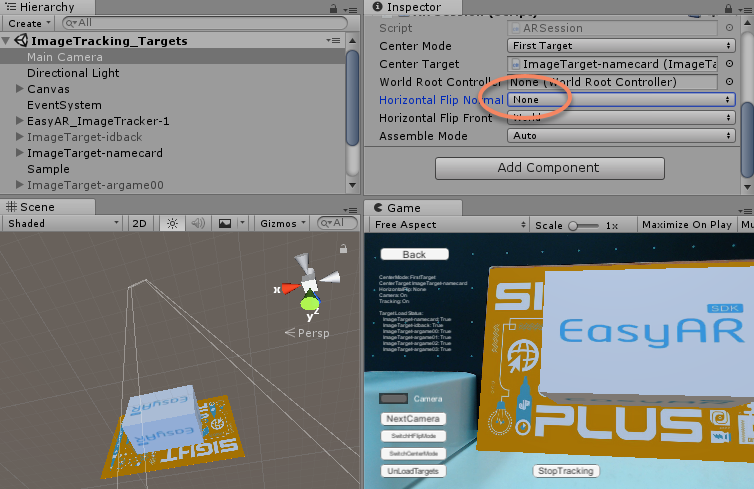
水平翻转相机图像
ARSession.HorizontalFlipNormal 及 ARSession.HorizontalFlipFront 控制了camera图像是如何进行镜像显示的。在camera图像镜像显示的时候,camera投影矩阵或 target scale会同时改变,以确保跟踪行为可以继续。
ARHorizontalFlipMode.None 模式下没有镜像显示。
ARHorizontalFlipMode.World 模式下,camera图像会镜像显示,camera投影矩阵会变化进行镜像渲染,target scale不会改变。投影矩阵的改变将对场景中所有物体产生副作用,如果这个效果不是你想要的,可以选择 ARHorizontalFlipMode.Target 模式。
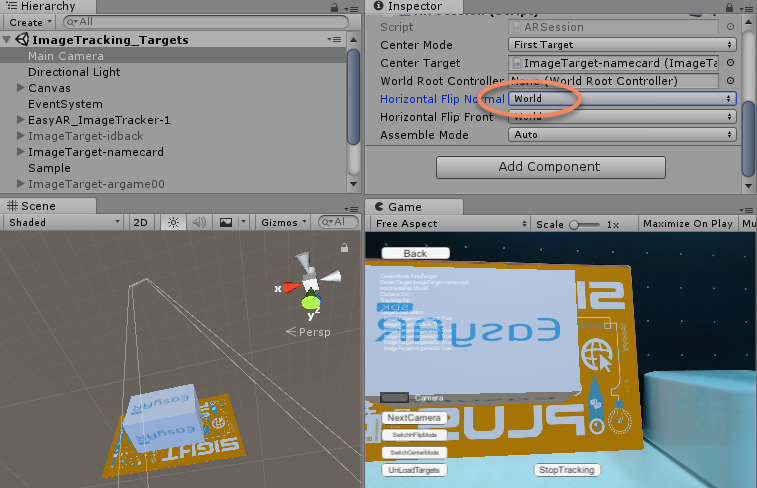
ARHorizontalFlipMode.Target 模式下,camera图像会镜像显示,target scale会改变进行镜像渲染,camera投影矩阵不会改变。

ARSession.HorizontalFlipNormal 及 ARSession.HorizontalFlipFront 可随时修改并将立即生效。